Thursday, March 24, 2011

Figure drawing basics

How many times have you tried to draw a person, and finally given up in frustration saying ?I can?t get this right?? Be patient with yourself and don?t give up! Mastering figure drawing may take several years; however, with practice, your skills gradually improve and your drawings of people begin to look better and better.

Brandon

This heavily illustrated project invites you to use a simple grid to outline a realistically proportioned face of an adorable baby named Brandon (who just happens to be my grandson). Hatching is used to add shading to the face, clothing, and hair.

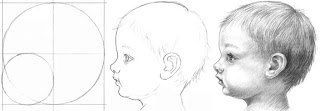
Baby Cameo

A profile of an infant’s tiny face, shaded with hatching lines, provides insights into his or her facial proportions in relation to the head size.

Jamie

With a focus on improving your observation skills by drawing upside-down, this project guides you through the process of combining lines with simple shading to draw a realistically proportioned face of a young child.

Sketching Figures with Lines

Rough, gesture, or action sketches are usually rendered very quickly, sometimes in less than a minute. The benefits of making rough sketches are in the process, rather than the creation of a magnificent work of art. Hence, you only goal is to capture a mood, expression or gesture on your drawing paper.

Long Straight Hair

You use slightly curved hatching lines of various lengths and values to draw realistic long straight hair.

Drawing Lips

With a focus on improving your observation skills, this project offers simple step-by-step illustrated instructions, to guide aspiring artists through the process of drawing human lips with a line of symmetry. Shading is rendered with contour hatching graduations.

Sketching from a Manikin

In this heavily illustrated lesson, I show you how to sketch a human figure from a wooden manikin. Manikins are wonderful models; they don't move, require no bathroom breaks, and don't talk your ears off!

Kim

In this fun cartoon of a young girl, I show you how to render super simple facial proportions, and the shiny texture of dark straight hair.

Drawing Eyelashes

In this project, you are challenged by the adversary of portrait artists –natural looking eyelashes. This lesson offers an understanding into the qualities of correctly drawn eyelashes, and shows you how to set up and draw the outline of an eye and add eyelashes.

Proportions of a Hand

This project offers simple step-by-step illustrated instructions, to guide aspiring artists through the process of outlining a proportionately correct adult human hand.

Horizontal Facial Proportions of Adults

Before you attempt to draw adult faces, it helps to know how to plan a place for everything, sort of like a blueprint. Even though the heads and faces of adults come in many shapes and sizes, the same basic guidelines for proportions apply to almost everyone.

Tuesday, March 15, 2011

Creating a Value Scale by Cindy Wider

Most drawing subjects can be rendered to appear three-dimensional with only five values plus white. This simple lesson takes you through the process of successfully creating a value scale with three grades of pencils.

Getting Started with Shading by Cindy Wider

This lesson is designed to introduce a beginner to several aspects of shading, from preparing and holding a pencil to creating and blending shading.

Baldy Noears

In this project, you draw a three dimensional cartoon by using contour hatching to shade the four spheres that define the forms of the head, nose and eyes.

Smelly Spheres

In this project, you draw a silly cartoon face that looks like a big fat nose!

Coming Out of the Dark

In this lesson you draw the three-dimensional form of a sphere with a focus on light, shadows, and a cast shadow. The medium is charcoal, and erasers are the drawing tools.

Friday, March 11, 2011

Wooly Woo Noo

You can't possibly make a mistake in this goofy project. The instructions are super simple and your only goal is to have fun!

Medieval Spoon

The design of the medieval spoon in this project is from my imagination. However, it is a reasonable representation of many used by peasants during the Renaissance. Function was more important than perfectly smooth edges or symmetry.

Light on a Mug

This project takes you step?by?step through the process of drawing a simple mug. You first sketch proportions, then outline the various contours, and finally add hatching lines to the sections that are in shadow. By the process of elimination, the remaining sections are touched by the light.

Seahorse

This fun project takes you step-by-step through the process of drawing a seahorse. You first sketch proportions, then outline the various contours, and finally add hatching lines.

Tulip

Tulips are among the most beautiful flowers and are also quite easy to draw. In this project, you use slightly curved hatching lines of various values and lengths to draw a tulip, as well as a section of its stem and leaf.Detailed step-by-step instructions take you through every aspect of setting up proportions, establishing the shape of the individual parts, and adding shading to create depth.

Serene Scene

Sketching is an action word, and you can only learn this skill by actually sketching. To give you a feel for the sketching process, numerous illustrations and simple text take you step-by -step through the process of rendering a sketch from one of my sketches (much easier than working from an actual scene).

Graduations with Contour Hatching

In this lesson, you use curved hatching lines and smoothly rendered graduations to depict the illusion of depth, and illustrate light and shadows on a close-up segment of a form.

Basic Contour Hatching

In this lesson, you use contour hatching to depict the illusion of depth, by transforming a circular shape into a three-dimensional form.

Corny Conehead

You add shading to the pompom with squirkling,and use diagonal hatching lines to finish the cone and face, and horizontal hatching lines for the cast shadow.

Sketching Outdoors

Sketching is an action word, and you can only learn this skill by actually sketching. In this lesson, I first offer suggestions for putting together a portable studio for your outings. I then take you step-by -step through the process of rendering a sketch of an outdoor scene.

Kobrah

This project guides you through the process of setting up proportional guidelines, and using symmetry to draw the facial features and hair of a male anime character named Kobrah. Super simple hatching lines are then added to the face to create the illusion of three-dimensional reality.

Graduated Values

Graduations are the primary ingredient in realistic shading. Hatching graduations are rendered by varying the density of lines, varying the pressure used in holding pencils, and/or using different pencils. The main goal is to keep the transition between the different values flowing into one another as smoothly as possible.

Playing With Pencils

Many artists struggle unnecessarily for years to create a full range of values with only one or two pencils, totally unaware of how pencils themselves can create different values. In this lesson, you create the illusion of depth in a mountain range, by using various grades of pencils. You will also utilize two components of perspective, overlapping and atmospheric perspective.

Hatching Simple Mountains

In this lesson, you outline three simple mountains and add shading with hatching.

Hatching Value Scales

When you can render sets of hatching lines well, you discover a very fast and simple way to achieve realistic shading in your drawings. Many different styles of hatching sets can be rendered, from lines that are very noticeable, to lines drawn so closely together that they look like a solid tone.

Monday, March 7, 2011

The Magic Ellipse by Cindy Wider

This lesson takes you step-by-step through the process of drawing an ellipse. You then use your ellipse drawing skills to render a drinking cup and a cookie jar.The ellipse is by far the most magical of all shapes. For example, ellipses can be added to the top and bottom of a straight sided shape to become a drinking cup.

One Point Perspective

In this lesson, you use basic one point geometric (also referred to as linear) perspective to transform a two-dimensional square or rectangle into a three-dimensional form.

Simple Atmospheric Perspective

In this lesson, you render a simple mountain range consisting of foreground, middle ground, and distant space, by using two components of perspective, overlapping and atmospheric perspective.

Overlapping Silly Faces

In this fun lesson, a group of silly faces seem to be floating through space. Overlapping, as a component of geometric perspective, is introduced as a means of creating depth.

Basic Perspective for Beginners

Perspective is the very foundation, on which your drawing compositions will either stand or fall. With proper use of perspective, your representational drawings become visually correct and more realistic. Understanding the rules of perspective can even enhance your creative skills, by allowing you the confidence to explore new concepts in depth perception in your drawings.